“What Is Thermal Imaging & Why Is It Important for a Home Inspection?”
- Introduction
- Brief explanation of home inspections and their significance
- Introduction to thermal imaging and its growing role in home inspections
- Understanding Thermal Imaging
- Definition and principles of thermal imaging
- How thermal imaging works in detecting temperature variations
- Key components of a thermal imaging camera
- Differentiating between thermal imaging and traditional visual inspections
III. The Importance of Thermal Imaging in Home Inspections
- Identifying hidden issues
- Detecting insulation deficiencies
- Locating air leaks and drafts
- Spotting moisture intrusion and water damage
- Enhancing electrical inspections
- Locating overheating electrical components
- Detecting electrical faults and fire hazards
- Identifying plumbing issues
- Pinpointing hidden leaks and pipe damage
- Evaluating the efficiency of radiant heating systems
- Detecting structural anomalies
- Identifying heat loss and energy inefficiencies
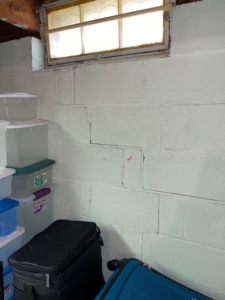
- Detecting foundation cracks and structural defects
- Advantages of Thermal Imaging in Home Inspections
- Non-invasive and non-destructive nature
- Time and cost efficiency
- Comprehensive and accurate assessments
- Enhanced safety and risk mitigation
- Limitations of Thermal Imaging in Home Inspections
- External factors influencing accuracy
- Interpretation challenges and the need for expertise
- Limitations in identifying certain issues
- Case Studies and Real-Life Examples
- Success stories of thermal imaging in home inspections
- Examples of issues detected by thermal imaging
- Impact of thermal imaging on decision-making and negotiations
VII. The Future of Thermal Imaging in Home Inspections
- Technological advancements and improvements
- Integration of artificial intelligence in thermal imaging
- Potential impact on home inspection standards and regulations
VIII. Conclusion
- Recap of the importance of thermal imaging in home inspections
- Encouragement for homeowners and buyers to consider thermal imaging
- Final thoughts on the future of thermal imaging in the industry
Introduction
Home inspections are a vital part of the real estate process, providing potential buyers and homeowners with a comprehensive assessment of a property’s condition. These inspections aim to identify any existing or potential issues that could affect the safety, functionality, and value of a home.
In recent years, thermal imaging has emerged as a valuable tool in conducting thorough and efficient home inspections. By detecting temperature variations, thermal imaging can uncover hidden problems that may not be visible to the naked eye. In this article, we will explore the importance of thermal imaging in home inspections and how it can benefit both buyers and homeowners.
Understanding Thermal Imaging
Thermal imaging utilizes infrared technology to capture and analyze temperature patterns emitted by objects and surfaces. It works by detecting the infrared radiation emitted by objects, converting it into a visual representation called a thermogram. The resulting image displays variations in temperature, with warmer areas appearing as brighter colors and cooler areas as darker colors.
To perform a thermal inspection, a qualified professional uses a thermal imaging camera. These cameras are equipped with special sensors that can detect and measure infrared radiation accurately. They are designed to capture and interpret temperature variations, allowing inspectors to identify potential issues that may be otherwise hidden from view.
The Importance of Thermal Imaging in Home Inspections
Identifying Hidden Issues
One of the primary reasons thermal imaging is crucial in-home inspections is its ability to detect hidden issues. Many problems, such as insulation deficiencies, air leaks, and moisture intrusion, may not be immediately visible to the naked eye. Thermal imaging can reveal temperature differences that indicate these problems, enabling inspectors to pinpoint their exact locations.
Insulation deficiencies: Inadequate insulation can result in significant energy loss and increased utility bills. Thermal imaging can quickly identify areas with insufficient insulation by detecting temperature variations along walls, ceilings, and floors. This allows homeowners to take corrective measures and improve energy efficiency.
Air leaks and drafts: Air leaks can significantly impact a home’s comfort and energy efficiency. Thermal imaging can reveal gaps and cracks in the building envelope, as well as areas where drafts are entering or escaping. By identifying these issues, homeowners can address them promptly, reducing energy waste and enhancing indoor comfort.
Moisture intrusion and water damage: Moisture intrusion can lead to mold growth, rot, and structural damage. Thermal imaging can detect hidden moisture by identifying cooler areas caused by water absorption or leaks. This early detection allows homeowners to mitigate the damage before it becomes extensive and costly.
Enhancing Electrical Inspections
Electrical issues pose serious safety hazards and are often difficult to detect visually. Thermal imaging can help inspectors identify electrical faults and potential fire hazards by detecting abnormal heat patterns. Overheating electrical components, loose connections, and overloaded circuits can be quickly identified using thermal imaging. This early detection can prevent electrical fires and protect the occupants of the home.
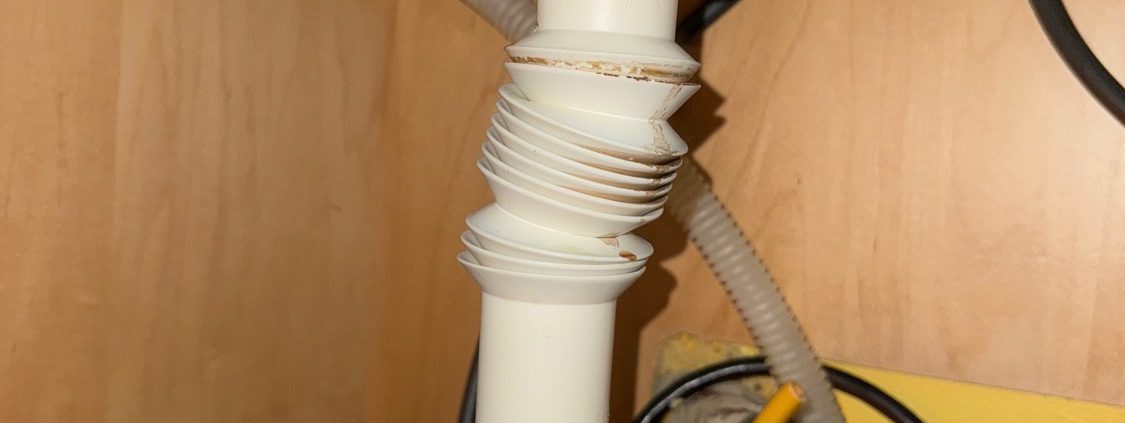
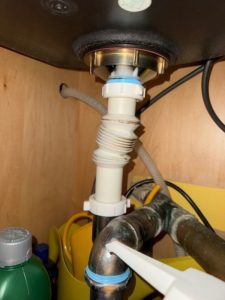
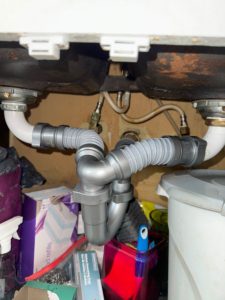
Identifying Plumbing Issues
Thermal imaging can be instrumental in locating plumbing issues that are not immediately apparent. It can detect hidden leaks behind walls, ceilings, or floors by identifying temperature differences caused by moisture. By pinpointing the precise location of leaks, homeowners can minimize water damage and reduce the risk of mold growth.
Thermal imaging is also valuable in evaluating the efficiency of radiant heating systems. It can identify areas of heat loss or malfunctioning components, ensuring optimal performance and comfort within the home.
Detecting Structural Anomalies
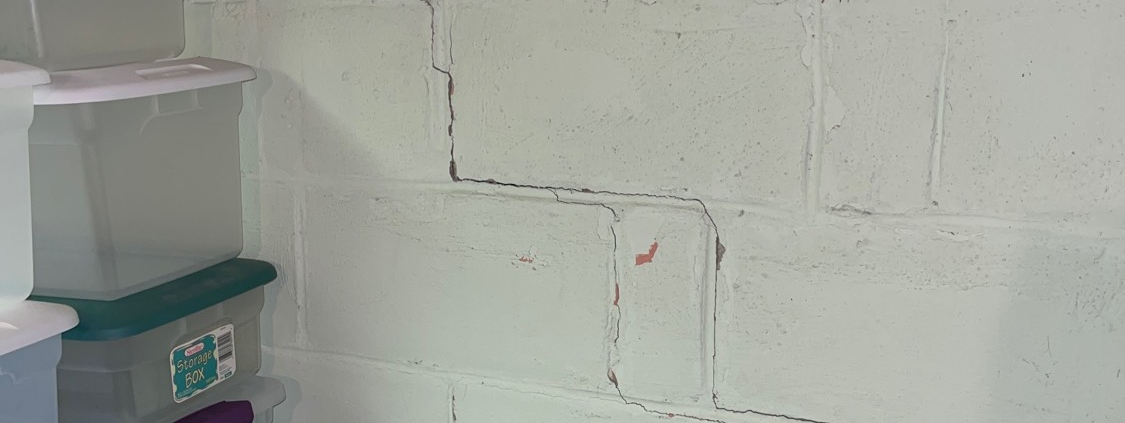
Thermal imaging can help uncover structural anomalies that may not be visible during a traditional visual inspection. It can detect heat loss or thermal bridging in walls, windows, and roofs, indicating potential insulation issues or energy inefficiencies. Additionally, thermal imaging can identify foundation cracks or areas of excessive moisture, providing early warning signs of potential structural defects.
 Advantages of Thermal Imaging in Home Inspections
Thermal imaging offers several advantages over traditional visual inspections in the context of home inspections:
Non-invasive and Non-Destructive: Thermal imaging is a non-invasive and non-destructive method of inspection. It does not require physical contact with the surfaces being examined, minimizing the disruption to the property and reducing the risk of further damage.
Time and Cost Efficiency: Thermal imaging enables inspectors to identify issues quickly and efficiently. It can detect problems that may otherwise require extensive manual investigation or even invasive testing. By streamlining the inspection process, thermal imaging saves both time and costs for homeowners and buyers.
Comprehensive and Accurate Assessments: Thermal imaging provides a comprehensive assessment of a property’s condition. It offers a visual representation of temperature differences, allowing inspectors to identify multiple issues simultaneously. This comprehensive approach ensures a more accurate evaluation of the property’s overall health and helps prioritize repairs and maintenance.
Enhanced Safety and Risk Mitigation: Thermal imaging can identify potential safety hazards such as electrical faults or overheating components. By detecting these issues early on, homeowners can take appropriate measures to address them promptly, minimizing the risk of accidents, injuries, or property damage.
Limitations of Thermal Imaging in Home Inspections
While thermal imaging is a valuable tool, it also has some limitations that need to be considered:
External Factors Influencing Accuracy: External factors, such as weather conditions, can affect the accuracy of thermal imaging. Factors like solar radiation, wind, or reflective surfaces can distort temperature readings and impact the interpretation of the thermograms. Therefore, it is essential for inspectors to consider and account for these factors during the inspection process.
Interpretation Challenges and the Need for Expertise: Thermal imaging requires expertise in interpreting thermograms accurately. Identifying potential issues and distinguishing them from normal temperature variations can be challenging, especially in complex building structures. Inspectors with specialized training and experience in thermal imaging are better equipped to analyze the results accurately.
Limitations in Identifying Certain Issues: Thermal imaging is not a foolproof method for detecting all types of issues. For example, it cannot identify mold or asbestos directly, as they do not emit significant temperature variations. Additionally, certain hidden problems, such as structural defects deep within walls, may not be detectable through thermal imaging alone. Therefore, thermal imaging should be used in conjunction with other inspection techniques to ensure a comprehensive assessment.
Case Studies and Real-Life Examples
To understand the practical applications of thermal imaging in home inspections, let’s explore a few case studies and real-life examples:
Insulation Deficiencies: During a home inspection, thermal imaging identified areas of inadequate insulation in the attic. The temperature variations revealed heat loss, indicating insufficient insulation coverage. This information allowed homeowners to take corrective measures, resulting in improved energy efficiency and reduced utility bills.
Electrical Faults: Thermal imaging detected an overheating electrical component within a wall during an inspection. This early identification enabled the homeowner to address the issue promptly, preventing a potential electrical fire and ensuring the safety of the property.
Hidden Water Damage: In a home inspection, thermal imaging uncovered a hidden water leak in a bathroom wall. The temperature differences detected by the camera indicated moisture intrusion. By locating the precise source of the leak, the homeowner was able to repair the plumbing and prevent further water damage and mold growth.
The Future of Thermal Imaging in Home Inspections
As technology continues to advance, the future of thermal imaging in home inspections looks promising. Here are a few potential developments to look out for:
Technological Advancements and Improvements: Thermal imaging cameras are becoming more compact, affordable, and user-friendly. Ongoing advancements in sensor technology and image processing algorithms are likely to enhance the accuracy and quality of thermal imaging results.
Integration of Artificial Intelligence in Thermal Imaging: Artificial Intelligence (AI) has the potential to revolutionize thermal imaging in home inspections. AI algorithms can be trained to analyze and interpret thermal images, automating the detection of anomalies and improving the efficiency of inspections. Machine learning techniques can help AI systems learn from vast amounts of data, enabling them to identify patterns and abnormalities more accurately over time.
Potential Impact on Home Inspection Standards and Regulations: The increasing adoption of thermal imaging in home inspections may lead to changes in industry standards and regulations. As thermal imaging becomes a more widely accepted and integrated tool, regulatory bodies may update guidelines to include specific requirements for thermal inspections. This could further emphasize the importance of thermal imaging as a standard practice in home inspections.
Conclusion
Thermal imaging has emerged as a valuable tool in modern home inspections, providing insights into hidden issues that may not be apparent during visual inspections. By detecting temperature variations, thermal imaging can identify insulation deficiencies, air leaks, plumbing issues, electrical faults, and structural anomalies. Its non-invasive nature, time and cost efficiency, comprehensive assessments, and enhanced safety benefits make it an essential component of a thorough home inspection.
While thermal imaging has limitations and requires expertise for accurate interpretation, it remains a powerful tool in the hands of qualified inspectors. As technology advances, with the integration of AI and improvements in camera technology, the future of thermal imaging in home inspections holds great promise. It is likely to become an even more integral part of the industry, contributing to improved safety, energy efficiency, and informed decision-making for homeowners and buyers alike.
REFERENCES:
U.S. Department of Energy. (n.d.). Thermal Imaging for Home Inspections. https://www.energy.gov/energysaver/thermographic-inspections
InterNACHI. (n.d.). Infrared Thermography Inspection.
https://www.nachi.org/ir-reports.htm
HouseLogic. (n.d.). What Is a Thermal Imaging Home Inspection?
https://www.houselogic.com
Infrared Training Center. (n.d.). Introduction to Thermography for Building Sciences. Retrieved from https://www.infraredtraining.com
Thermal Imaging for Home Inspections Explained
https://www.homegauge.com/learning/thermal-imaging-for-home-inspections-explained/
About Cornerstone Home Inspections:
Located in Hubertus WI, Cornerstone has been trusted by home buyers to help them make informed buying decisions. Our home inspections typically range from 2.5-3.5 hours depending on the size of the house or condo. You are invited to follow along with your inspector as they perform their inspection.
We have achieved the distinction of Certified Master Inspector as determined by the Master Inspection Certification Board. All Cornerstone Inspectors are trained to these standards and operate under a Certified Master Inspector.
Areas Served:
- Waukesha
- Menomonee Falls
- Germantown
- West Bend
- Hartford
- Pewaukee
- Sussex
- Grafton
- Cedarburg
- Oconomowoc
- Watertown
Cornerstone Home Inspections include our thermal imaging of the main electrical box to add even more value to our inspections at no additional cost. Please see our thermal imaging page for more information on what thermal imaging can do.
FULLY LICENSED & INSURED
Cornerstone follows the Wisconsin State Standards of Practice. We are fully licensed by the State of Wisconsin. State license number 2355-106.
We are fully insured, carrying both general liability as well as errors & omissions insurance, including agent and broker inspector referral coverage.
Whether you’re buying or selling a home, having a professional home inspection from a leading home inspection company will give you peace of mind and assist you in a fair and smooth transaction.
WE OFFER A WIDE RANGE OF INSPECTION AND TESTING SERVICES INCLUDING:
- RESIDENTIAL HOME INSPECTIONS
- CONDO INSPECTIONS
- PRE-LISTING INSPECTIONS
- RADON CRM TESTING
- DRONE SERVICE NOW INCLUDED AT NO ADDITIONAL COST!
- ONE HOUR REPORTS
- NEW VISUAL REPORTS
- THERMAL IMAGING
NEW VISUAL REPORTS:
We now feature a computerized report that allows our inspectors to add pictures and comments to the report onsite. This type of report delivery allows for a more detailed explanation of the area of concern, giving you the knowledge to make an informed purchase decision. The computer report is then emailed directly to you and your realtor, saving precious time in the real estate transaction.
THERMAL IMAGING:
Cornerstone Home Inspections include our thermal imaging of the main electrical box to add even more value to our inspections at no additional cost. Please see our thermal imaging page for more information on what thermal imaging can do.
FULLY LICENSED & INSURED
Cornerstone follows the Wisconsin State Standards of Practice. We are fully licensed by the State of Wisconsin. State license number 2355-106.
We are fully insured, carrying both general liability as well as errors & omissions insurance, including agent and broker inspector referral coverage.
Whether you’re buying or selling a home, having a professional home inspection from a leading home inspection company will give you peace of mind and assist you in a fair and smooth transaction.
If you have any questions regarding your house, just call and we will answer it. If we can’t answer it right away, we will find the answer for you. At Cornerstone, your total satisfaction is our number one priority.
Call us today at 262-607-CSHI to book your home inspection.
Cornerstone Home Inspection
Michael Ford
262-607-2744
Hubertus, WI 53033
mike@cornerstonehi.com
https://www.cornerstonehi.com
Insert/ Embed Map:
<iframe src=”https://www.google.com/maps/embed?pb=!1m14!1m8!1m3!1d11630.518684565466!2d-88.2713999!3d43.2172562!3m2!1i1024!2i768!4f13.1!3m3!1m2!1s0x880501eb897359d5%3A0xfa5a14ae3b83d3ae!2sCornerstone%20Home%20Inspection!5e0!3m2!1sen!2sus!4v1683890896558!5m2!1sen!2sus” width=”600″ height=”450″ style=”border:0;” allowfullscreen=”” loading=”lazy” referrerpolicy=”no-referrer-when-downgrade”></iframe>


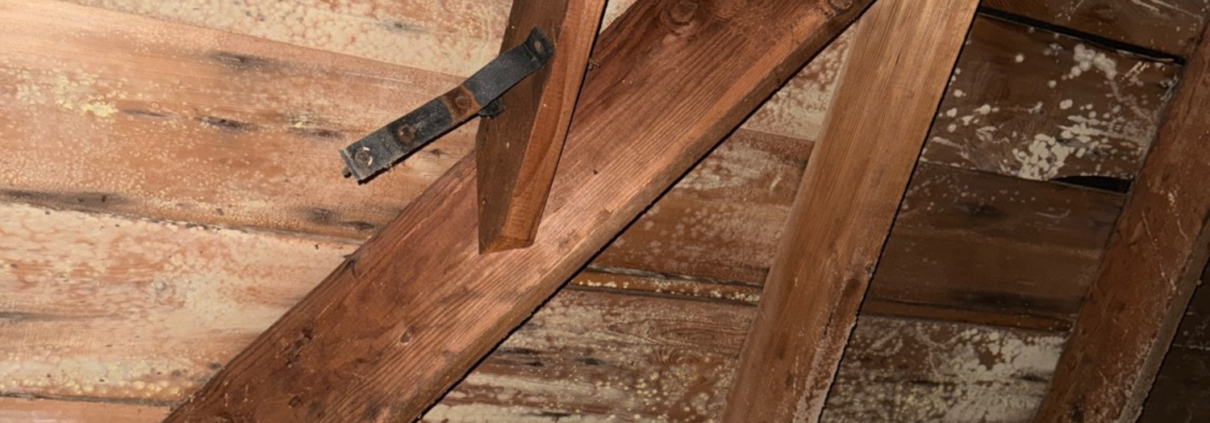
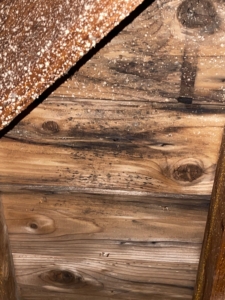
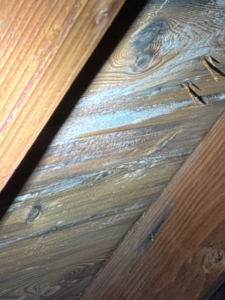 Growth in the attic is a serious problem and more common than most people think. Discolorations that are black, grey, white and often look fuzzy are examples of growth. Growth can be found in any area but is often found in attics where people are not checking very often. Growth is often caused by insufficient insulation, insufficient venting, or more often a combination of both.
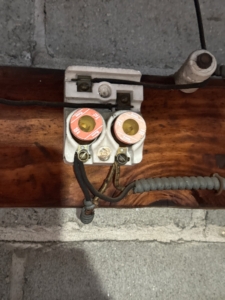
 From Wikipedia: Knob-and-tube wiring (sometimes abbreviated K&T) is an early standardized method of
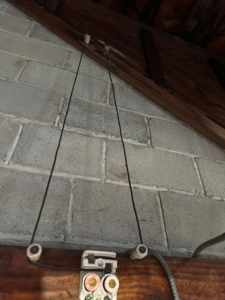
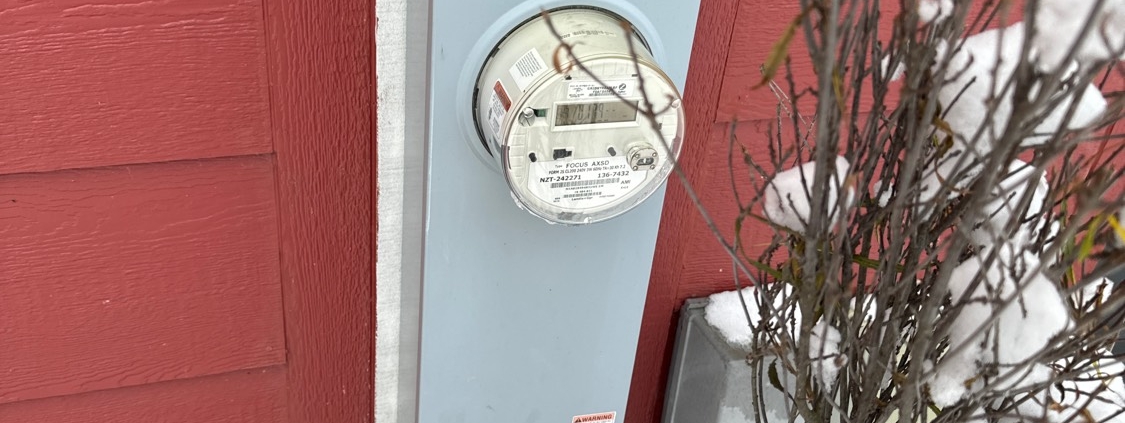
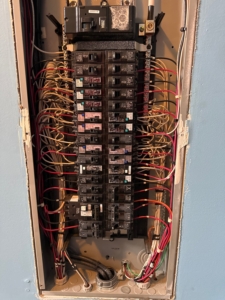
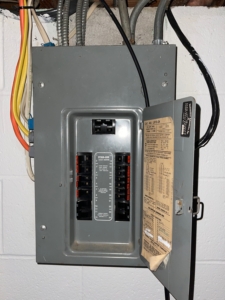
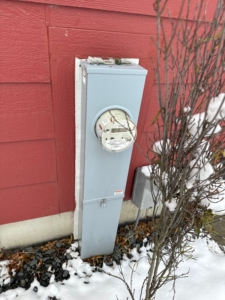 If a different location is desired, the main disconnect will often be located on the service meter itself, with a sub panel located anywhere in the house. That allows the wire from the new main disconnect to be protected from shorting out. Without that, the wire from the meter to the disconnect is not protected and susceptible to shorting out. Recently on a newer construction in the Waukesha area, the only panel in the house was located in the first floor laundry room.